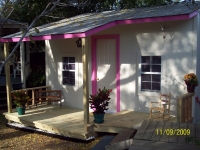
Outside Playhouse
This is the playhouse that I built for my 4 year old daughter's birthday November of 2009. Planning ahead with her growing up, it seemed practical to build it in a manner that she would not outgrow. It was also cheaper to build the outside playhouse instead of adding to the home, thereby avoiding any property tax increase because of square footage. The cost of materials for this project was $6,000. Though this house is smaller than the Storage Shed, much more went into it to make it feel like a home. The size of this playhouse is 16'x12' with numerous amenities as you will see.
The frame construction was the same as the storage shed. The only difference is that this outside playhouse is insulated, drywalled and contains an air conditioner / heater combination. I decided to try setting the frame on the posts first to see how it would work out. The structure is very sturdy, however, it would have been better to complete the flooring first, then the frame on top of that. On this house, I used composite siding. Most of the siding available on the market, though primed, is still untreated panels. Composite siding is thinner and much heavier because it contains cement, however, you will not have any problems with termites.
Though I did not line the outer frame with roofing paper, the R-Value of 19 insulation provided more than enough protection from the elements. The flooring is 3/4" plywood with cemented supports every two feet making the foundation very sound. The ceiling dose have an eight foot clearance, with three windows for ventilation. The windows are 2'x3' with double sided glass. I ordered a Disney purple color for the mini-blinds from Home Depot to compliment the colors that my daughter likes.
The texture was done with a basic roller and plaster. I do recommend you do two coatings and let it dry for at least three days otherwise the plaster will start to flake off. In addition also do two coats of paint. I used a High Gloss Antique White which is easy to clean and you get the benefit of reflective lighting when you have the mini-blinds open. Now as for the door, I recommend you get a door with complete frame which includes the metal plate on the bottom. I had a heck of a time trying to level this frame because it was not complete. Also, I had to replace the wood strips that went around the door. The ones that come with it were too thin.
On the matter of electrical, I added two breakers. One was a 20 Amp to handle the heater/aircondition and a 15 Amp for the 110 Volt lighting and outlets. The wire for the heater combo should be a 10/3. That is, 10 being the rating of the thickness of the wire so the electrical current will not degrade the further away from the Main box it is. And 3 for the Black, White and Red wire needed for the combo unit. Though the wire I obtained was for outdoor use, I still placed it inside a 3/4" Pvc Pipe for added protection. The wires were also brought up from under the flooring to minimize the possibility of making contact with them when installing the dry wall or when using supports
for photos, etc. I installed three switches. One
for the two fluorescent lights, one for the fan and the other for rope lighting for the patio. Rope lighting is an excellent way to light and area without it being blinding from a direct source.
Another feature that I added was having a cable line installed for the television and in the not too distant future a phone line for DSL access. As children get older, their privacy becomes more important and so this outside playhouse becomes their domain. It is not every boy or girl that can say, daddy built me a house. This is a project that is very practical and that a child will benefit from for many years to come. As with the other projects, I will put together a materials list of what you would need and which you would modify based on your plans. 